REVIEW · OAHU
Kayaking Rainforest River on Oahu, Kahana River(Self-Guided Tour)
Book on Viator →Operated by Salty Kayaks Hawaii · Bookable on Viator
Oahu’s water days can feel busy—this one slows down. A self-guided kayak (or SUP) outing on the Kahana River gets you out past the easy shore line and into rainforest vibes, with mountain views and a chance to explore a small islet. It’s designed to feel low-stress once you’re launched, not like a group paddle drill.
I really like that everything sets you up for an independent trip: you get clear instructions and safety tips up front, and the kayaks are made for beginners—stable and easy to handle. I also like the included gear setup, especially the 10L dry bag for your stuff and life vests that take the guesswork out of what to wear.
One thing to plan for: the “bonus stop” often includes a steep hike up rocky terrain on the island, and water conditions can change fast with wind and currents. Bring real foot protection, not just flip-flops, and don’t assume it will be perfectly calm.
In This Review
- Kahana River Kayaking: What You’ll Notice First
- Arriving at Kahana Bay Beach Park (And Getting Off Fast)
- First, You Get Safety Tips (So You Can Relax on the Water)
- Paddling the Kahana River: Calm Effort, Big Scenery
- The Little Island Stop: Easy Paddle Out, Steep Views Up
- Snorkeling and the “what will I see?” question
- If you hate steep hikes, adjust your plan
- What’s Included (And Why It’s Good Value for a Self-Guided Day)
- Timing and Pacing: How a 3-Hour Trip Really Feels
- Wind, Currents, and Rocky Areas: When You Should Be Extra Cautious
- Who This Trip Fits Best (And Who Might Want Another Option)
- Booking With Salty Kayaks Hawaii: What to Know Before You Go
- Should You Book This Kahana River Kayak Tour?
- FAQ
- What should I do first when I arrive?
- Is this a guided tour or self-guided?
- What’s included with the kayaking or SUP?
- Where do I meet for the tour?
- How long is the experience?
- Can I bring a service animal?
- What should I bring for the islet hike?
- What happens if the weather is bad?
Kahana River Kayaking: What You’ll Notice First
- Beginner-friendly kayaks and optional SUP so you can choose what fits your comfort level
- Everything is delivered to Kahana Bay Beach Park, so you show up and go
- A 10L dry bag and life vest keep your day practical (and your camera dry)
- You’ll get a map texted to your phone, which helps you stay on track self-guided
- Expect a steep, rocky hike on the islet if you want the best viewpoints
- Weather and water matter, especially wind and currents near rocky areas
Arriving at Kahana Bay Beach Park (And Getting Off Fast)
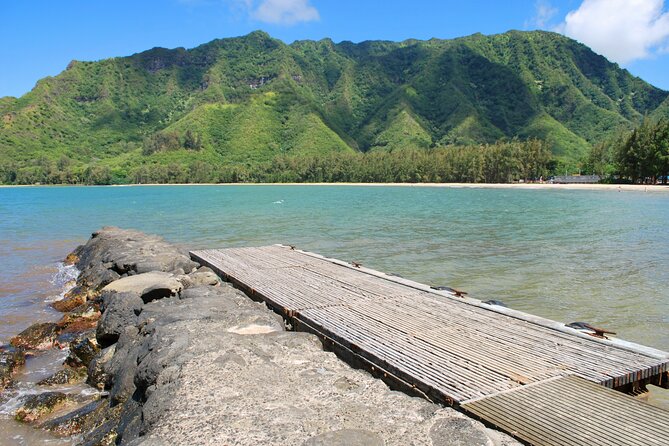
Your trip starts at Kahana Bay Beach Park, with the meeting point listed at 54-52 Kamehameha Hwy, Hauula, HI 96717. The key detail here is that you’re not hauling your own gear through the parking lot like it’s a gym session. The operator delivers the kayaks (or SUP boards) and gear to the beach setup, and you’re guided through what to do before you head out.
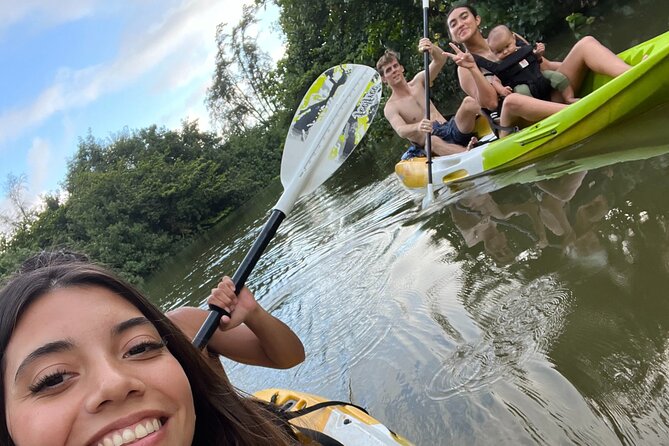
The experience is run as a private activity for your group only, which matters more than it sounds. Fewer people means less waiting, fewer bottlenecks at the launch, and a smoother rhythm when you’re ready to paddle. It’s also self-guided, so after the initial instruction, you’re not tied to a strict “line up and follow me” pace.
If you’re coming with mixed ability levels—one confident paddler, one newer—this setup tends to feel fair. Beginner-oriented kayaks are stable, so you can focus on steering and balance instead of fighting the boat.
You can also read our reviews of more guided tours in Oahu


First, You Get Safety Tips (So You Can Relax on the Water)
Before you launch, you’ll receive activity instructions plus best-practice safety tips. This is the part that sets expectations. You’re not being left with a vague checklist. Even though the paddle itself is self-guided, the day is still built around helping you make smart decisions once you’re on the water.
The equipment also supports that beginner-friendly goal. You’ll get a life vest and dry bag for your personal items, and the dry bag is specifically a 10L size. That’s big enough for the usual essentials—phone, wallet, a thin layer—without turning into a second backpack to manage while you paddle.
Quick practical thought: wear your life vest properly and keep straps snug. It’s not just about safety—it reduces that annoying shifting during paddling. And since you’ll be near rocky areas on land later, you’ll want to plan what goes into the dry bag versus what you’ll carry in your day bag or pockets.
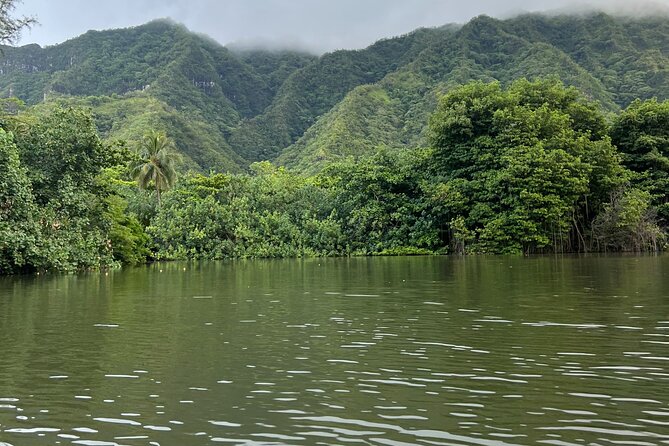
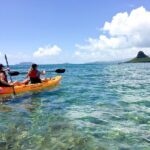
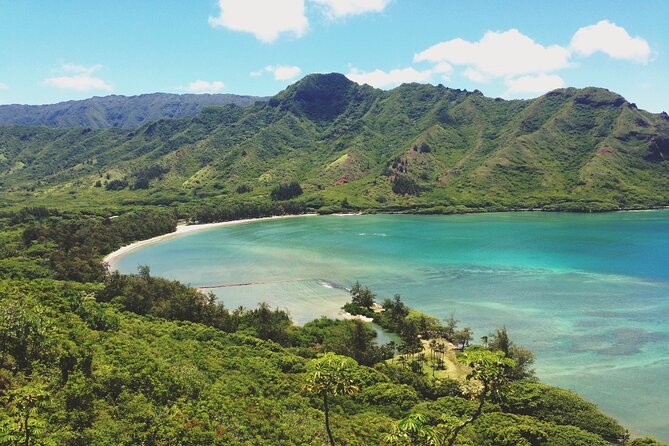
Paddling the Kahana River: Calm Effort, Big Scenery
Once you’re in, you’ll spend your time kayaking along the Kahana River with views framed by lush rainforest and majestic mountains (the kind of backdrop that makes your shoulders forget they’re working). The pace is the point. This isn’t about sprinting. You glide, stop when you want, and keep an eye on the shoreline.
Because the trip is self-guided, you’ll be able to match the paddle to your energy. That flexibility is great if:
- you want photos without rushing,
- your group moves at slightly different speeds,
- you’d rather spend time exploring than “covering distance.”
A small but important reality check from past participants: the conditions can change with wind and currents, and some areas can involve rougher water with lava rock around. That doesn’t mean you should cancel your day—just don’t assume you’ll have glass-calm water the whole time. If you feel unsure at any point, slow down and take control of your positioning instead of pushing forward.
The Little Island Stop: Easy Paddle Out, Steep Views Up
A big highlight of this outing is the chance to head over to a little island and explore. The paddle to it is often described as manageable—an “easy” effort for many people—so you’re not grinding for hours just to reach your landing spot.
Once you dock and shift from water to land, the tone changes. The exploration involves a steep hike on rocky ground. Several people specifically warned that it’s not just a casual stroll. One of the most repeated practical tips is to bring sandals or shoes that grip and support your feet well—sandals with a back strap can be safer than loose flip-flops. Another reminder: going bare-foot on hot or rough rock can wreck your feet fast.
If you want the viewpoints, you’ll likely need to be ready for that uphill effort. It’s the trade-off: you get dramatic views and interesting terrain, but you should treat it like an actual hike, not beach time.
Snorkeling and the “what will I see?” question
Some people tried a bit of snorkeling around the islet and were surprised by how limited fish sightings can be. That doesn’t mean snorkeling is pointless, just that you should treat it as optional and expect it may not be a reef parade. If you’re bringing snorkeling gear, do it with flexible expectations.
You can also read our reviews of more tours and experiences in Oahu


If you hate steep hikes, adjust your plan
This part matters for your enjoyment. If your group isn’t excited about climbing rocky terrain, you can still enjoy the water portion and scenery. But if your heart is set on the top views and secret-cove style exploration, you’ll want footwear and a realistic mindset for the climb.
What’s Included (And Why It’s Good Value for a Self-Guided Day)
This trip is valuable because it reduces the friction of doing a water adventure on your own.
Here’s what’s clearly part of the package:
- Beginner-friendly kayaks (and SUP is optional)
- Life vests
- 10L dry bags for your belongings
- Gear delivery to the beach meeting point
- Instructions and best-practice safety tips
- A map texted to your phone to help you navigate self-guided
That combination is what makes self-guided work well for real people—not just experienced paddlers. You’re not spending time figuring out gear or cobbling together safety basics. You can focus on the day itself: paddling, taking photos, and deciding how long to linger at the island.
Timing and Pacing: How a 3-Hour Trip Really Feels

You’re looking at about 3 hours total (approx.). That duration is long enough to feel like an experience, but short enough that you don’t burn your whole vacation day.
In practice, your time is split between:
- the prep and instruction at the launch,
- paddling time along the river,
- landing and exploring the islet,
- the paddle back.
This matters because the hike can stretch your schedule. If someone in your group is slower on rocky terrain, give yourself a little buffer. The beauty of self-guided is you can slow down, but the day is still only about three hours, so you’ll want your group to agree on how much climbing is “worth it.”
Wind, Currents, and Rocky Areas: When You Should Be Extra Cautious

One honest theme from the experience is that conditions can be changeable. Wind can pick up, and currents exist in the area. Also, lava rock can create sharp edges if you’re careless near land.
So here’s your practical checklist:
- Wear real foot protection for the hike and any foot steps near rock.
- Move slowly while docking and leaving the kayak, especially in wind.
- Keep your phone and essentials in the dry bag so a splash doesn’t turn into a ruined day.
- If you feel uneasy, take it down a notch—no hero moves.
This isn’t a “fear everything” warning. It’s simply good seamanship and good hiking sense. The trip works best when you respect the water and the terrain.
Who This Trip Fits Best (And Who Might Want Another Option)
This is a strong match if you:
- want a self-guided day with clear prep and practical gear,
- are a beginner and want stable equipment,
- like rainforest scenery and viewpoint rewards,
- don’t want to be stuck in a big mass-group pace.
It’s less ideal if you:
- hate steep rocky hikes (the islet climb can be tough),
- don’t want to deal with changing wind or current conditions,
- can’t wear secure footwear for rough ground.
The good news is you can choose your comfort level. If the hiking part is your limit, you can still enjoy the paddle and choose how much island exploration you do.
Booking With Salty Kayaks Hawaii: What to Know Before You Go
The operator for this outing is Salty Kayaks Hawaii. Based on how the experience is set up, you’ll want to come ready for a water-and-hike mix.
One key detail: the day is weather-dependent. You’ll need good weather. If it gets canceled due to poor weather, you’ll be offered another date or a full refund. That flexibility is helpful, because on the ocean-side conditions (wind and roughness) can swing.
When deciding what to pack, think in two categories: water essentials and hike essentials.
- Water: phone, sunscreen, water, camera (in the dry bag)
- Hike: secure footwear, something you can grip on rocky ground
If you’re filming or doing lots of photos, also remember the dry bag size (10L)—choose what matters, and keep bulky items out.
Should You Book This Kahana River Kayak Tour?
Book it if you want a low-stress, self-guided paddle with rainforest scenery and the option to explore an islet for views. The included gear and clear instruction make it feel doable, even if you’re new to kayaking. I’d also book if you like “your own pace” travel days—stop when you want, take photos without waiting, and enjoy the calm rhythm.
Skip it or choose a different plan if steep, rocky hikes aren’t your thing. The kayaking may be beginner-friendly, but the land portion can be demanding, and you’ll need footwear that can handle lava rock and uneven ground.
If you’re on the fence, your best move is simple: plan for the hike with proper shoes, and be flexible with weather. Do that, and this is a fun, scenic way to see Oahu from the water without the typical crowded tour feel.
FAQ
What should I do first when I arrive?
You’ll get instructions and best-practice safety tips before launching, so you know what to do before you head out.
Is this a guided tour or self-guided?
It’s self-guided. You paddle on your own after the initial instructions and setup.
What’s included with the kayaking or SUP?
You’ll have access to beginner-friendly kayaks or an optional SUP, plus a life vest and a 10L dry bag.
Where do I meet for the tour?
You meet at Kahana Bay Beach Park, listed at 54-52 Kamehameha Hwy, Hauula, HI 96717.
How long is the experience?
It lasts about 3 hours (approx.), and it ends back at the meeting point.
Can I bring a service animal?
Yes, service animals are allowed.
What should I bring for the islet hike?
Bring something with secure traction for your feet. Sandals with a back strap were recommended, and flip-flops or bare feet were called out as risky on steep, rocky ground.
What happens if the weather is bad?
This experience requires good weather. If it’s canceled due to poor weather, you’ll be offered another date or a full refund.